Friday, June 12, 2020

Hollywood

Sharing another layout with you that was a kit from Scrapbook Generations. This was the third layout I had from this trip set to go and this was the one I could not get to work with the old products I had. With the other layouts redone, it was easy to select this kit to go with these photos. 
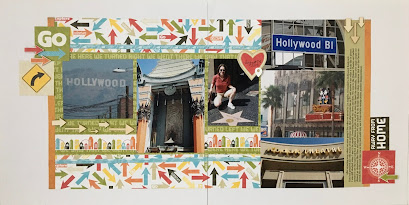

I did some tweaking to this layout as well. I had more photos and words to put on the page than initially intended. I struggled to fit the photos I had into this kit, but I am happy with how everything fits and works well. 


I switched up the title cards and added these squares to work with the right bottom corner. I added the wood veneer arrows to add dimension to an otherwise flat design.


I always have more to say on a layout than I really have room for, so I created a journaling strip and extended the layout on both sides with some orange patterned paper left over from the beach layout I shared below.


Added some more arrows, in part because my printer was giving me fits since the card stock was too thick to pull in correctly and center it. It made the printing seem more on purpose and part of the design.


Finished it off with a few more square tiles to match the title and called this set of layout complete. So happy to have this and the other 2 layouts out of that Pages in Progress pile and into an album!

Off to complete some more! Thanks for stopping by!


Wednesday, June 3, 2020

MZMommies

Sharing a layout here today that has been in my pages in progress pile. It is by far one of the more recent to be added, but it made it to the pile because I was having trouble finding the date the photo was taken. Luckily, when searching the date for another layout, I happened across this one!

I believe this layout was initially inspired by an enlarged photo layout by Shimelle. I believe Glitter Girl may  have solved the day with this one. 


Papers on this layout are from an Amy Tangerine collection, the dies are from an SCT Sampler kit filled with Vicki Boutin die cuts, stickers are from Amy Tangerine’s sticker book and a few puffy stickers from Elle’s Studio.


Used some of my favorite Thickers for the title and added the date with some stamps.

Love to have this one done, the story told and in my album!

Tuesday, May 26, 2020

Habit- Maddie

The layout I have to share with you was inspired by Ali Edwards Story Stamp of the theme of habit. After brainstorming ideas of what stories I wanted to tell, Maddie’s thumb sucking habit came to the forefront. 


When starting the design of this layout, I had already written the journaling so I knew how much room I needed to reserve for it. I don’t usually design with this in mind, but in seeing some hybrid layouts lately and the journaling being on the base of the layout, I started there. I don’t have a large format printer so printing directly on the background of a 12x12 isn’t really possible.

I also struggled with products on this one. Couldn’t figure out what mood and feel I wanted this layout to have. During a YouTube live with Alice Boll, I asked what to do in this instance and she shared a layout on the same topic! With her example and things shared in the comments I decided florals, chevrons and a grid to print my journaling on. I also knew I wanted to use the Story Stamps on the layout.


I knew I wanted to use floral clusters on this layout, it is a challenge for the Simple Scrapper membership for the month of May. I went through quite a pile of die cuts looking for florals with matching colors, good size and two that coordinated for my layout. My 4 year old asked me if she could help me make something and pulled out along side me. I told her what I was looking for and she said, “what about those flowers in that jar.” Duh! Goes to show I have so much stuff in my space I forget what I have.

So I found flowers in my stash and decorated them with stitched buttons. I also die cut some leaves from a Stampin’ Up! Sizzix die.

Finished the cluster with some wood veneer arrows.


Used a border punch on the right side of the layout to add a bit of detail. Stamped the date and wrapped this one up.

Loved how this ended up turning out.

Thanks for stopping by to check it out!

Sunday, April 19, 2020

URhere

Another Bucket List Project Class layout complete. 


This layout originally looked like this and had been stuck that way for years. I could never finish for a few reasons. I didn't know what to say. I struggled what to put on the journaling. Second reason was that I was not in love with the products I was using. I had semi-completed another layout that was from the same trip that used the same products, and I just couldn't get it to work for me.

After sitting in my pages-in-progress pile for years, once I had come across an old class layout, taught by my friend in California, Colleen O'lear, that I had made on my trip to visit old friends and my old stomping ground, I knew with some minor adjustments, would be perfect for the photos and story that I wanted to tell.


I struggle with using memorabilia on my pages, so I was excited to use it for this one! The ticket worked well in place of a large photo. 

Love that the original layout used these Tim Holtz stamps, as well. 


There were a few things I added to the original layout design. In moving some of the photo mats around, I tore the green background paper. In an effort to cover it up, I found a Doodlebug DoodlePop sticker from my SCT sampler kit from some months back whose colors and theme matched perfectly. Layered on a shelf of washi tape. To balance the other side of the journaling block, I stretched the washi to the other side and had a tag with a stamped sentiment from Ali Edwards, a retired set from Technique Tuesday. Repeated the twine from the first page as a finishing touch. 

To cover up hole punches on the photos that I had also cropped down, I added some silver stars sprinkled about to cover them up. Love that it hides the imperfect photos and adds a touch of shine.


Thanks for checking out my layout. So excited to have this story told and a layout that I love! Hope to share more layouts from my Bucket List Project class soon!


Sunday, April 12, 2020

First Birthday Party

Today I have a layout to share with you that I actually created quite a while ago. I created this layout back in 2010, if I remember correctly. It features a MyMindsEye collection that was an all time favorite of mine.

The reason I am sharing the layout now, is because it has taken me that long to get journaling on this page. As part of Simple Scrapper's Bucket List Project class, I finally figured out how to get some words on the page! Jennifer Wilson shared a birthday layout of her daughter that used this stamp, "I want to remember", as a jumping off point. I thought it would be an easier way to document this story where so many ideas and areas of focus could be used.


I knew I wanted to use the stamp as a jumping off point but struggled with how to add it to the page since it was complete....well mostly.

Once I decided I would place different journaling spots around the page to add some balance, the next step was to physically add it to the page. 


The next problem I encountered was what color to journal in. The page had no black anywhere and I was afraid to use black that it would be distracting, having too much contrast.


The layout was based on a sketch, but being created so long ago, I don't remember which, but I am guessing from PageMaps.


I decided to go with my old typewriter to type the journaling. Hoping it would create less contrast than my handwriting with a pen or another font on the computer. I also had my journaling prewritten and I was worried if I hand wrote, it wouldn't fit in the space I had left to play with.


Another update I made to this layout was the stamped title. I used the blue ink on the journaling prompt and I wanted to repeat that color other places on the layout so I decided to use the First Story Stamp set from Ali Edwards to complete the title. Using that stamp also allowed for an awkward gap to be filled. Love how it turned out.

One of the techniques I love that I had used was cutting out duplicate lanterns from the patterned paper and popping them up for some added interest and texture without being distracting.


Also loved the pennant die I used with different patterns from this collection, adding the number 1 on some for more repetition.


Last touch was a date label from Elle's Studio with the date stamped.

Thanks for stopping by to check out my layout. Hoping to share another soon! 


Saturday, February 15, 2020

Through Aaron’s lens

Here is another layout that I have had in the works for quite a long time! This layout is based on the Lens Story Stamp from Ali Edwards.

I apologize for the quality of photos. I struggled with the lighting when taking these. Being a 2 page, made it even more difficult.


For this layout I used Shimelle's Box of Crayon's project pad to for the base of this layout. I then added the Tim Holtz metal number clips to label the photos my son took for this project.


I am trying to do some stash busting, especially with my 3x4 cards, so I dove into those to find some for my journaling as well as for an embellishment cluster. 

I stamped from many of my Ali Edwards' stamp sets, not just the Lens set. I know the "what I see" was from a Technique Tuesday set from my stash, and the "stuff I love" is from the Stuff stamp set.


The title cluster uses fussy cut cameras from Box of Crayons, stickers from the sticker folder that match, some enamel dots and a flair from my stash.


Love it when I can get multiple stamps on any given page, to justify my ever growing number of stamps! Thanks for stopping by!


Monday, February 10, 2020

Brave

This layout was inspired by Ali Edwards' Brave story stamp.

I used Shimelle's Glitter Girl project pad and stickers from her AC sticker book to create most of the elements on this page.


Featured many of the stamps in this set to create the page. I created the title as well as the embellishment circle elements. I fussy cut some florals from one of the patterned papers to embellish the page.


This heart stamp was a perfect description of my little girl!


Dove in my stash and found a few odds and ends like the decorative paper clip and yellow tag. Sprinkled some Heart enamel shapes and called this one done!


 Really love when I get stories like this recorded and love how the design turned out too! Thanks for looking!