Thursday, June 25, 2020

Pieces of Me

Today I am sharing my Pieces of Us project. I followed along with Ali Edwards' prompts in February for her self portrait adventure. 

I knew I wanted to make something with the images and words I had documented in Instagram over the week, and when I came across this sketching the Simple Scrapper membership, I knew I had the perfect layout design to work from.


I used some paper from Jen Hadfield, as well as some chip board pieces from one of her collections. I also found some stitched ephemera pieces that came from Maggie Holmes.

I stamped Pieces of Me using Story Stamps from theme of pieces and me. The "of" was stamped using partial inking of one of the stamps in one of those sets. I stamped in grey ink and used clear embossing powder to have it stand out a bit more. Gave it a different texture.


I added the prompts list as a photo to put the project into more context. To show it was more than just a thing I decided to do on my own.


I struggled with fitting all of my words on the layout, and the font was a bit tiny, but it worked for the space that I had allotted for it. I used some older Ali Edwards stamps that were the days of the week. Thought the handwriting matching the title worked nicely.

I have been taking Stacy Julian's 20 in 20 class this year. One of the projects she recommended for us to do in February was something about us right now. I thought this was a perfect project to do for the assignment as well as fit with the other "pieces' Story Stamp stories I was working on telling at the time.

Thanks for stopping by and checking out my layout!


Friday, June 19, 2020

Play Your Way

After my youngest was playing with this toy, the gum ball machine, I realized how different my kids were when they played with it. I could remember taking pictures of the older two playing with this toy, but wasn't sure about the Ally, my third child. Luckily I had, and luckily it showed how she had played with it in the photographs!

So I had the story I knew I wanted to tell and the photos to support it, then it was how to put it together.

Ali Edwards' Story Stamp theme for one month was Play, which was perfect to use with my story. Next, I had to decide on a layout design and products. 

I decided to do a two page layout. I had too much stuff with four sets of photos, and journaling for each. I decided to block it, where each child got have a page.  

When looking for paper, I wanted to find a pattern that was multicolored and had bright colors that reminded me of the toy. I found a stripe in Shimelle's Box of Crayons project pad, but couldn't find any subtle tone on tone patterns that worked with my story. There is colored card stock included in the pad, so I found ones in that collection as well as another (Glitter Girl, maybe.) That matched the stripes in the patterned paper.

I don't tend to use colored card stock much any more, preferring more depth with patterns, but decided it was a good opportunity to create my own patterned paper with the Play themed Story Stamps from Ali Edwards.

This is what I created. 


I debated on whether to create a repeating pattern or make it random. I chose the repeating pattern, knowing I would most likely like the overall look better if it repeated. I also tested some of the paper out with some Distress Inks to find a good match to the color of papers that I had chosen.


Really love how it turned out. I felt a bit disappointed that so much of it got covered up! Will definitely be doing this technique again and will select a design that will give it more room to shine next time.

Here is the final layout!


For the title, I found a Thicker phrase from Shimelle, that said play and some old Simple Stories alphas to create the rest of the title.

The title rests on a die cut I created using a Tim Holtz Sizzix die.

Because I had so many dates on this page, the dates of each set of photos, I wanted to include what day I journaled this story. I used a new stamp set from Everyday Explorers National Scrapbook Day bundle to add that. I tucked it in above the two photos of my son. Seemed like the best fit for the layout.


Another element to this layout that I was excited about was the stamped and paper pieced gum ball machine. The stamp is from Lawn Fawn. I had loved the fact that the stamp set came will all kinds of different faces to give the gum balls, and had no real thought to using it in this way when I bought it.

It wound up being a perfect embellishment for this story! I stamped it multiple times on each of the color card stocks and cut the pieces out and pieced it together. I am not much of a stamp colorer, so this worked best for me. Later for an embellishment around my photos, I stamped more gum balls and scattered them around the page.


For each child, I die cut their names using some old alpha dies from Quickutz. I stamped the date the photo was taken under that. I debated on whether I should add their ages under that, but they were all between 9 months old and a year and wasn't sure how to add it without complicating my design.


I found a journaling card for each child and gave it a subtitle with how they played with the toy. My kids got a kick out of them when they saw me putting this layout together, loving to hear how they played with it and how that was different from the others.


In repeating elements of the first page, I added two more View Master Reels and some heart Thickers from the same pack as the play word.


Love how this turned out! Super fun layout to make and love the story that it tells! 

Thanks for stopping by to take a look!


Friday, June 12, 2020

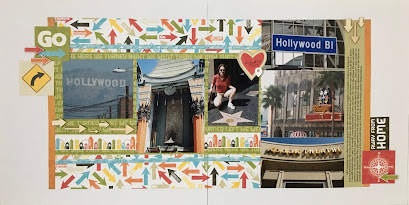
Hollywood

Sharing another layout with you that was a kit from Scrapbook Generations. This was the third layout I had from this trip set to go and this was the one I could not get to work with the old products I had. With the other layouts redone, it was easy to select this kit to go with these photos. 


I did some tweaking to this layout as well. I had more photos and words to put on the page than initially intended. I struggled to fit the photos I had into this kit, but I am happy with how everything fits and works well. 


I switched up the title cards and added these squares to work with the right bottom corner. I added the wood veneer arrows to add dimension to an otherwise flat design.


I always have more to say on a layout than I really have room for, so I created a journaling strip and extended the layout on both sides with some orange patterned paper left over from the beach layout I shared below.


Added some more arrows, in part because my printer was giving me fits since the card stock was too thick to pull in correctly and center it. It made the printing seem more on purpose and part of the design.


Finished it off with a few more square tiles to match the title and called this set of layout complete. So happy to have this and the other 2 layouts out of that Pages in Progress pile and into an album!

Off to complete some more! Thanks for stopping by!


Wednesday, June 3, 2020

MZMommies

Sharing a layout here today that has been in my pages in progress pile. It is by far one of the more recent to be added, but it made it to the pile because I was having trouble finding the date the photo was taken. Luckily, when searching the date for another layout, I happened across this one!

I believe this layout was initially inspired by an enlarged photo layout by Shimelle. I believe Glitter Girl may  have solved the day with this one. 


Papers on this layout are from an Amy Tangerine collection, the dies are from an SCT Sampler kit filled with Vicki Boutin die cuts, stickers are from Amy Tangerine’s sticker book and a few puffy stickers from Elle’s Studio.


Used some of my favorite Thickers for the title and added the date with some stamps.

Love to have this one done, the story told and in my album!

Tuesday, May 26, 2020

Habit- Maddie

The layout I have to share with you was inspired by Ali Edwards Story Stamp of the theme of habit. After brainstorming ideas of what stories I wanted to tell, Maddie’s thumb sucking habit came to the forefront. 


When starting the design of this layout, I had already written the journaling so I knew how much room I needed to reserve for it. I don’t usually design with this in mind, but in seeing some hybrid layouts lately and the journaling being on the base of the layout, I started there. I don’t have a large format printer so printing directly on the background of a 12x12 isn’t really possible.

I also struggled with products on this one. Couldn’t figure out what mood and feel I wanted this layout to have. During a YouTube live with Alice Boll, I asked what to do in this instance and she shared a layout on the same topic! With her example and things shared in the comments I decided florals, chevrons and a grid to print my journaling on. I also knew I wanted to use the Story Stamps on the layout.


I knew I wanted to use floral clusters on this layout, it is a challenge for the Simple Scrapper membership for the month of May. I went through quite a pile of die cuts looking for florals with matching colors, good size and two that coordinated for my layout. My 4 year old asked me if she could help me make something and pulled out along side me. I told her what I was looking for and she said, “what about those flowers in that jar.” Duh! Goes to show I have so much stuff in my space I forget what I have.

So I found flowers in my stash and decorated them with stitched buttons. I also die cut some leaves from a Stampin’ Up! Sizzix die.

Finished the cluster with some wood veneer arrows.


Used a border punch on the right side of the layout to add a bit of detail. Stamped the date and wrapped this one up.

Loved how this ended up turning out.

Thanks for stopping by to check it out!

Sunday, April 19, 2020

URhere

Another Bucket List Project Class layout complete. 


This layout originally looked like this and had been stuck that way for years. I could never finish for a few reasons. I didn't know what to say. I struggled what to put on the journaling. Second reason was that I was not in love with the products I was using. I had semi-completed another layout that was from the same trip that used the same products, and I just couldn't get it to work for me.

After sitting in my pages-in-progress pile for years, once I had come across an old class layout, taught by my friend in California, Colleen O'lear, that I had made on my trip to visit old friends and my old stomping ground, I knew with some minor adjustments, would be perfect for the photos and story that I wanted to tell.


I struggle with using memorabilia on my pages, so I was excited to use it for this one! The ticket worked well in place of a large photo. 

Love that the original layout used these Tim Holtz stamps, as well. 


There were a few things I added to the original layout design. In moving some of the photo mats around, I tore the green background paper. In an effort to cover it up, I found a Doodlebug DoodlePop sticker from my SCT sampler kit from some months back whose colors and theme matched perfectly. Layered on a shelf of washi tape. To balance the other side of the journaling block, I stretched the washi to the other side and had a tag with a stamped sentiment from Ali Edwards, a retired set from Technique Tuesday. Repeated the twine from the first page as a finishing touch. 

To cover up hole punches on the photos that I had also cropped down, I added some silver stars sprinkled about to cover them up. Love that it hides the imperfect photos and adds a touch of shine.


Thanks for checking out my layout. So excited to have this story told and a layout that I love! Hope to share more layouts from my Bucket List Project class soon!


Sunday, April 12, 2020

First Birthday Party

Today I have a layout to share with you that I actually created quite a while ago. I created this layout back in 2010, if I remember correctly. It features a MyMindsEye collection that was an all time favorite of mine.

The reason I am sharing the layout now, is because it has taken me that long to get journaling on this page. As part of Simple Scrapper's Bucket List Project class, I finally figured out how to get some words on the page! Jennifer Wilson shared a birthday layout of her daughter that used this stamp, "I want to remember", as a jumping off point. I thought it would be an easier way to document this story where so many ideas and areas of focus could be used.


I knew I wanted to use the stamp as a jumping off point but struggled with how to add it to the page since it was complete....well mostly.

Once I decided I would place different journaling spots around the page to add some balance, the next step was to physically add it to the page. 


The next problem I encountered was what color to journal in. The page had no black anywhere and I was afraid to use black that it would be distracting, having too much contrast.


The layout was based on a sketch, but being created so long ago, I don't remember which, but I am guessing from PageMaps.


I decided to go with my old typewriter to type the journaling. Hoping it would create less contrast than my handwriting with a pen or another font on the computer. I also had my journaling prewritten and I was worried if I hand wrote, it wouldn't fit in the space I had left to play with.


Another update I made to this layout was the stamped title. I used the blue ink on the journaling prompt and I wanted to repeat that color other places on the layout so I decided to use the First Story Stamp set from Ali Edwards to complete the title. Using that stamp also allowed for an awkward gap to be filled. Love how it turned out.

One of the techniques I love that I had used was cutting out duplicate lanterns from the patterned paper and popping them up for some added interest and texture without being distracting.


Also loved the pennant die I used with different patterns from this collection, adding the number 1 on some for more repetition.


Last touch was a date label from Elle's Studio with the date stamped.

Thanks for stopping by to check out my layout. Hoping to share another soon!